Ideas
Simple Mehndi Designs 2026: 60 Easy Front Hand, Back Hand and Arabic Ideas
60 simple mehndi designs for the front hand, back hand, fingers and feet, with the eight basic shapes every design is made from, how to hold a cone, a week of practice and how to plan simple designs for your guests.
- 60 designs: front hand, back hand, Arabic, fingers, modern, festivals, feet, bridal and for men
- Eight basic shapes make almost every simple design
- A seven-day practice plan and step-by-step designs for beginners
- Always natural henna: never black henna or instant cones
Outfits and beauty · 33 min read · By The Shaadiwaale team · Updated 20 October 2026
A great deal of mehndi is simple mehndi. For every bride who sits for an afternoon, there are many sisters, cousins, friends and guests who want something pretty on their hands in the time it takes to finish a cup of chai. There are festival mornings, office weeks and college functions. And there is the first evening you pick up a cone and try it yourself.
This guide is for all of them. It has 60 simple mehndi designs for the front hand, the back hand, the fingers and the feet, in Arabic, traditional and modern styles, for festivals, for guests and even for brides who want a light look. Before the designs comes the handful of basic shapes that every simple design is made from. After them: how to make a simple design look finished, how to hold a cone, a week of practice for beginners, ready-made cones and homemade paste, getting a dark colour, and planning simple designs for the guests at your own mehndi.
Quick answer: Simple mehndi designs are light henna patterns built from a few basic shapes, such as dots, lines, leaves, petals and small flowers, with plenty of bare skin around them. Most take from a few minutes to about half an hour a hand. Popular simple designs include a round rosette in the palm, a diagonal Arabic trail on the back of the hand, a band at the wrist and capped fingertips. They suit guests, festivals and everyday wear, and they are the best way to learn. Use natural henna only, never black henna.
What's in this guide
- What is a simple mehndi design?
- Simple mehndi, old and new
- Simple mehndi designs at a glance
- Front, back or both?
- The basic shapes behind every simple design
- Simple mehndi designs for the front hand
- Simple mehndi designs for the back hand
- Simple Arabic mehndi designs
- Simple finger mehndi designs
- Modern simple mehndi designs
- Simple designs for festivals and occasions
- Simple feet mehndi designs
- Simple bridal mehndi designs
- Simple mehndi for men and grooms
- Simple designs for children
- Simple mehndi for work, college and everyday
- Matching the two hands
- Making a simple design look finished
- Building a simple design up
- Getting ready for a simple design
- How to draw a simple design, step by step
- How to hold a mehndi cone
- Drawing on someone else's hand
- A seven-day practice plan for beginners
- Ready-made cones and homemade paste
- Getting a dark colour on a simple design
- Planning simple designs for your guests
- Questions to ask your mehendi artist
- Mistakes to avoid
- Staying safe
- Frequently asked questions
What is a simple mehndi design?
There is no official definition, but artists and families usually mean the same thing: a design with one main idea, a few basic shapes and plenty of bare skin. You will also hear simple designs called easy mehndi or basic mehndi. The words are used loosely and overlap, and none of them is a strict category.
Four things make a design simple:
- One focal point. A rosette, a flower or a trail, rather than three motifs competing for attention.
- Open space. As much bare skin as paste, often more, so the shapes stand out.
- Few fillers. Fillers such as jaal, which means net, and shading take most of an artist's time; simple designs use very little of them.
- A short sitting. Up to about half an hour a hand, and often much less.
Simple does not mean plain. A clean design with good proportions often looks more elegant than a crowded one, it is easier to keep neat while it dries, and it suits almost any outfit. If you want the newest ideas in every style, from full bridal hands to Pakistani fine fill, our mehndi designs hub covers the latest designs for 2026. This page stays with the simple ones.
Simple mehndi, old and new
Simple designs are not a modern shortcut. In many countries henna has long belonged to ordinary days as well as big ones: in 2024, inscribing the henna practices shared by sixteen Arab states as intangible cultural heritage, UNESCO described henna as part of everyday life as well as festive occasions such as births and weddings.1 It also noted that these traditions are passed on within families and communities by watching and doing, and today through beauty centres, universities and the media as well.1
That is still how many people learn simple mehndi: by watching an aunt, a sister or a friend, and then trying a few dots and leaves on their own hand. For the long story of mehndi in India and beyond, read our history of mehndi.
Simple mehndi designs at a glance
Here are seven of the designs below, chosen to show the range. The times are rough, for one hand (the bridal row is for both palms), and depend on the artist and the hand.
| Design | Where it goes | Rough time | Skill needed | Best for |
|---|---|---|---|---|
| Petal rosette | Centre of the palm | 10 to 15 minutes | Beginner | Festivals, guests |
| Diagonal sprig | Back of the hand | 5 to 10 minutes | Beginner | Office, college, everyday |
| Scallop band | Palm, under the fingers | About 10 minutes | Beginner | Festivals, family functions |
| Three-bloom diagonal | Back or front of the hand | 15 to 20 minutes | Some practice | Weddings, parties |
| Thread and ring | Back of the hand | 10 to 15 minutes | Some practice | Engagements, parties |
| Line-art leaf | Back of the hand | About 5 minutes | Some practice | Modern outfits |
| Light bridal palms | Both palms | One to two hours | Confident | Brides who want a light look |
Front, back or both?
Before choosing a design, decide where it goes. Each side of the hand does a different job.
The front hand, or palm, takes the deepest colour and is what you see yourself. It is the traditional place for mehndi, it suits round designs such as rosettes and mandalas, and because palms take the darkest, longest-lasting stain,2 it is the better choice if you want the colour to last.
The back hand is what other people see, and what the camera catches. It suits diagonals, cuffs and single flowers, and it works well with rings and bangles. The stain is lighter, so it needs bolder shapes.
Both gives the fullest look for the time: a simple palm design with a matching cuff or trail on the back still takes well under an hour for most artists. If you only have time for one side, choose the back for a party where you will be photographed, and the palm for a festival or a puja.
And if you are short of time altogether, do just the fingers. A row of capped fingertips and a ring line on each finger makes any hand look dressed for the occasion.
The basic shapes behind every simple design
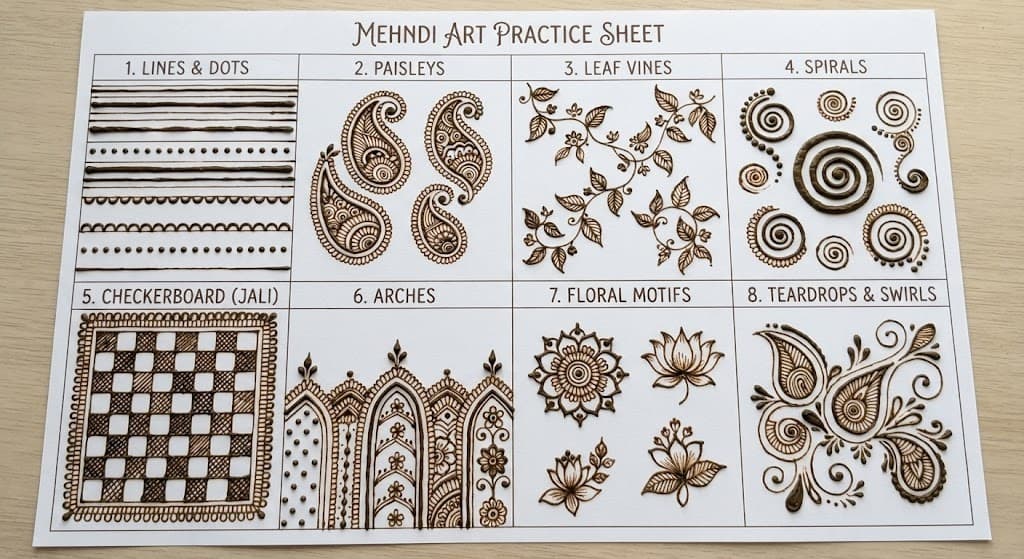
Almost every simple design is made from eight shapes. Learn them on paper, and you can draw most of the 60 designs on this page.
- The dot. Touch the tip to the skin, squeeze for a moment and lift straight up. Dots make borders, fill gaps and finish fingertips.
- The line. Let the tip barely touch the skin and the paste fall into place as you move your wrist and forearm smoothly, rather than just your fingers. Steady pressure gives an even line.
- The curve. A C-shaped line, easiest when you draw it towards yourself. Curves become arches, petals and the edges of bands.
- The S-curve. Two curves joined, the backbone of every vine and Arabic trail.
- The teardrop. Squeeze to make a round head, then ease off as you pull away to a point. Teardrops are petals, leaves and drops.
- The leaf. Two curves that meet at both ends, with a line down the middle for the vein.
- The spiral. A small coil, used to finish the end of a vine or to fill a corner.
- The scallop. A row of small joined bumps, used for edges, bands and lace.
Put them together and the designs appear. Ring a dot with five teardrops and you have a flower. Run leaves along an S-curve and you have a bel, which means a vine. Add rings of teardrops around a centre and you have a rosette. Curl the point of a teardrop over and you have the paisley, known in India as ambi or kairi, from the words for mango.
Simple mehndi designs for the front hand
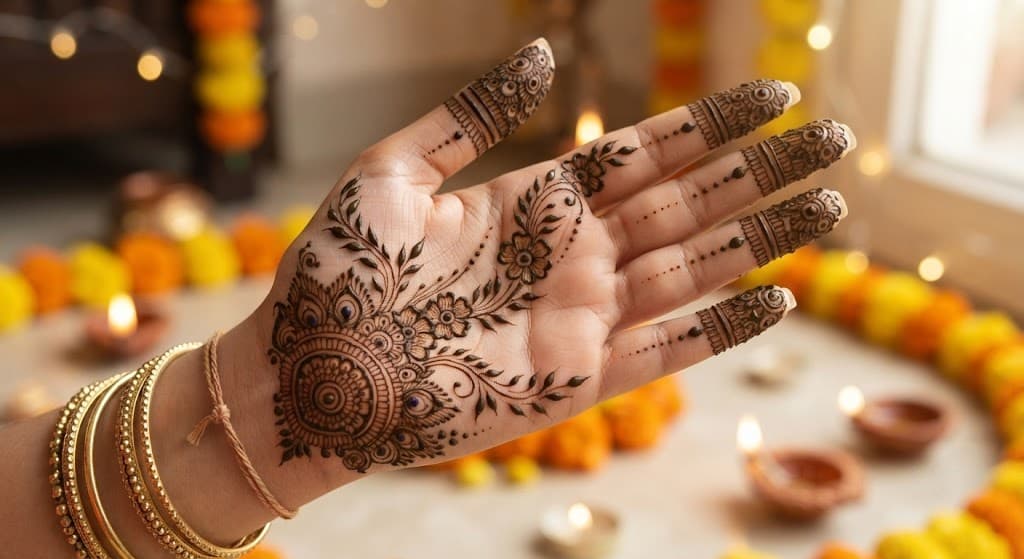
The palm takes one of the deepest colours on the body, because palms and soles have the thickest layer of skin,2 so even a light design looks rich there. Simple front hand designs usually sit in the centre of the palm or along one side, with the fingertips done to finish. The time after each design is rough: quick is anything up to about thirty minutes, medium is an hour or two, and long is anything more.
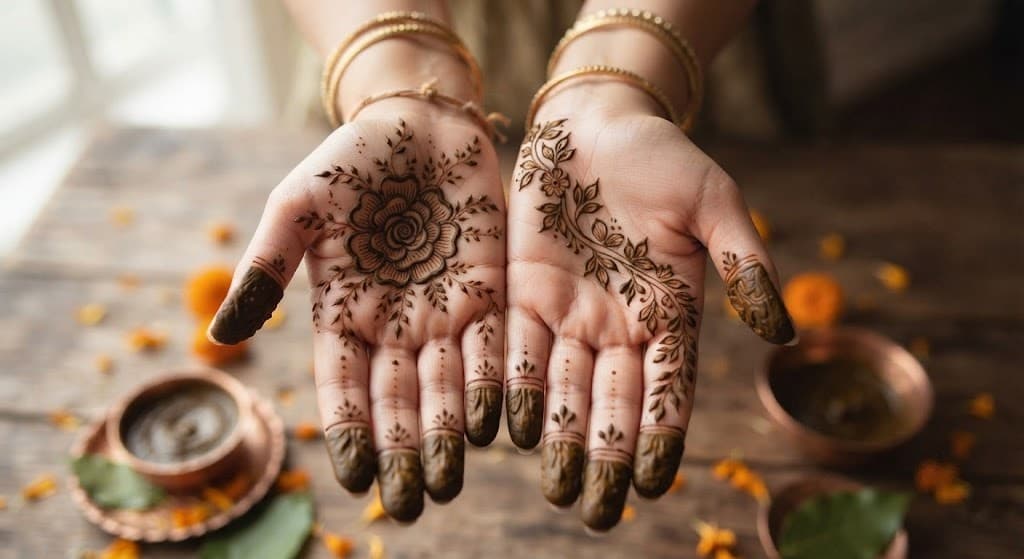
- Petal rosette. Eight petals around a dot in the centre of the palm, with a single ring of dots outside them. Draw the four petals that point up, down, left and right first, and the rest fall into place. Time: quick.
- Leafy crescent. A curve of small leaves from the base of the index finger round to the heel of the palm, like a half wreath. Make the leaves smaller towards each end so the curve tapers. Time: quick.
- Thumb bouquet. Three small flowers clustered on the pad below the thumb, with two leaves tucked between them. Lovely if you want the rest of the palm bare. Time: quick.
- Wrist arch. A single arch across the wrist with a fringe of dots hanging from it, and capped fingertips. It frames the palm without filling it. Time: quick.
- Dotted spine. A straight line of dots and tiny circles from the base of the middle finger to the wrist, with a small leaf on either side every few dots. Keep the dots evenly spaced and it looks like jewellery. Time: quick.
- Teardrop fan. Five teardrops fanning out from the centre of the palm, one pointing to each finger. Add a dot at the tip of each teardrop for a finished look. Time: quick.
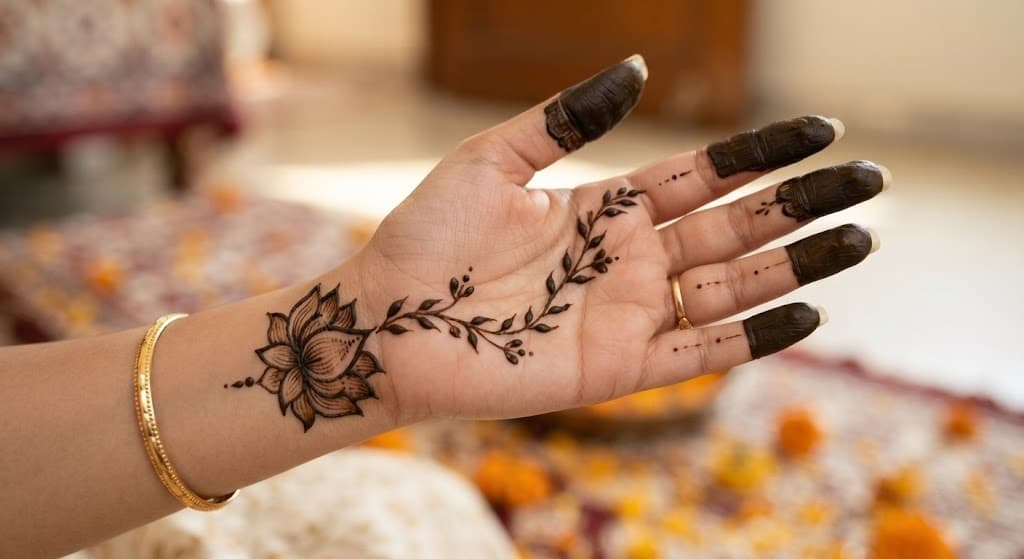
- Low lotus. An open lotus at the heel of the palm, just above the wrist, with its petals pointing up towards the fingers. It leaves the middle of the palm bare, which looks fresh and modern. Time: quick.
- Single paisley. One paisley in the middle of the palm, outlined twice and edged with dots. Fill the inner shape with tiny circles if you want a little more. Time: quick.
- Crossing vines. Two thin vines crossing in an X over the palm, each ending in a spiral. Draw both stems first, then the leaves. Time: quick.
- Scallop band. A row of scallops along the top edge of the palm, below the fingers, with all the fingertips capped. The quickest way to make a palm look decorated. Time: quick.
- Checked square. A small square in the palm with alternate boxes filled, for a modern, graphic look. Use a ruler-straight line from the arm, not the fingers. Time: quick.
- Simple peacock. Just the curved neck and head of a peacock rising from the wrist, with three feather eyes beside it. The hardest design in this section, so practise it on paper first. Time: quick to medium.
Simple mehndi designs for the back hand
When you fold your hands, hold a plate or pose for a photograph, it is the back of the hand that shows. It takes a lighter stain than the palm, so bolder lines and a few filled shapes help a simple design stand out. Our guide to back hand mehndi designs has 60 more, from easy to bridal.
- Knuckle scallop. A scalloped line across the knuckles with a dot in every curve, and nothing else. Pair it with capped fingertips if you want a little more. Time: quick.
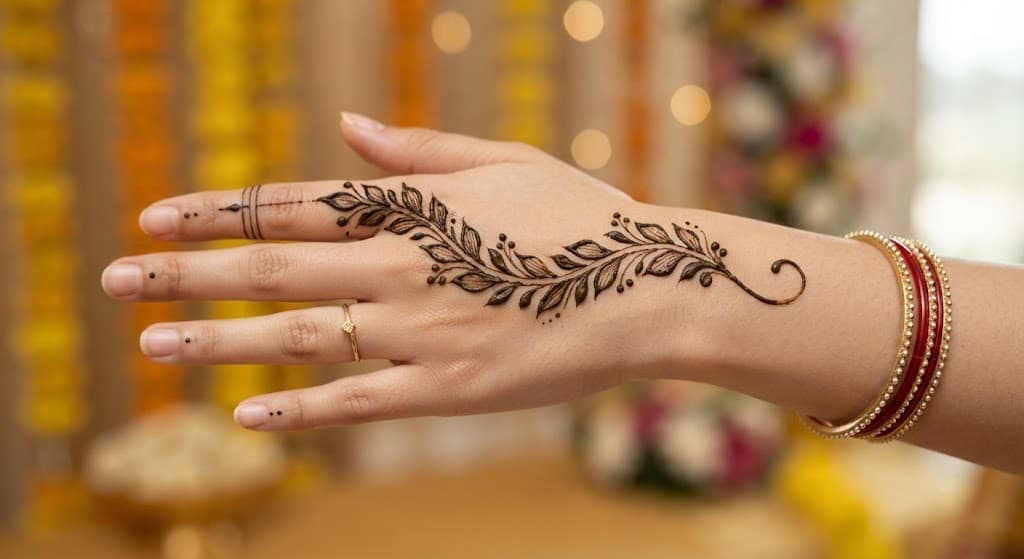
- Diagonal sprig. A single sprig of seven leaves running from the base of the index finger diagonally to the far side of the wrist. The step-by-step version is further down this page. Time: quick.
- Thread and ring. A thin band at the wrist joined by a fine line to a ring on the middle finger, with one small flower where the line meets the ring. It looks like a delicate hand ornament. Time: quick.
- Petal star. An eight-petal flower right in the middle of the back of the hand, a dot between each pair of petals. Fill alternate petals for contrast. Time: quick.
- Dot ladders. A line of dots running down each finger from the nail to the knuckle, getting smaller as they go. Lovely with long nails. Time: quick.
- Edge mandala. A half rosette on the outer edge of the hand, below the little finger, opening towards the thumb. It shows when you hold your hand out flat. Time: quick.
- Chevron cuff. Two or three rows of small chevrons around the wrist, like a woven bracelet. Keep the rows parallel by drawing the outer lines first. Time: quick.
- Wave line. One wavy line across the back of the hand from thumb to little finger, with dots above and below each wave. Quick, and it suits every hand shape. Time: quick.
- Leaf crown. Small leaves arranged in a semicircle around the base of the middle finger, like a crown. Make the middle leaf the tallest. Time: quick.
- Jaal diamond. A small diamond of fine netting at the middle of the back of the hand, finished with a dot on each point. A good first try at jaal. Time: quick.
Simple Arabic mehndi designs
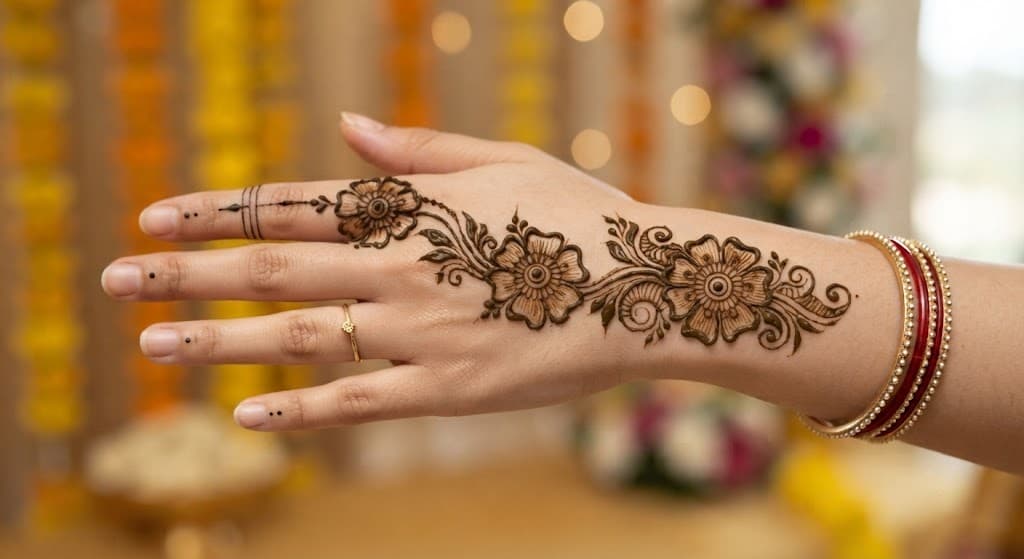
The style known in India as Arabic mehndi is a natural fit for simple designs: bold flowers and leaves, usually in a diagonal trail, with bare skin all around. Simple Arabic designs keep the trail short and the shading light. Our guide to Arabic mehndi designs has 60 more, with the history of the style.
- Three-bloom diagonal. Three shaded flowers in a line from the index finger to the wrist, joined by a few leaves. Make the middle flower the largest. Time: quick.
- Thumb sweep. A short trail of leaves from the base of the thumb curving round to the wrist. It looks good on both sides of the hand. Time: quick.
- Leaf and bud trail. Shaded leaves with tiny closed buds between them, running diagonally across the palm. Buds are quicker than open flowers. Time: quick.
- Finger and band. An Arabic vine down one finger, joined to a thin band at the wrist. Choose the index or the middle finger. Time: quick.
- Big flower, short trail. One large shaded flower near the knuckles, with a short trail of leaves below it. Shade only the inner half of each petal to keep it light. Time: quick.
- Open palm diagonal. A light diagonal of flowers and leaves across the palm, with more bare skin than paste. The palm version of the classic Arabic look. Time: quick.
- Petal bracelet. A band of shaded petals around the wrist, with one finger vine above it. Good with a single bangle. Time: quick.
- Middle and ring. Short trails on the middle and ring fingers that join at a single bloom above the knuckles. Time: quick.
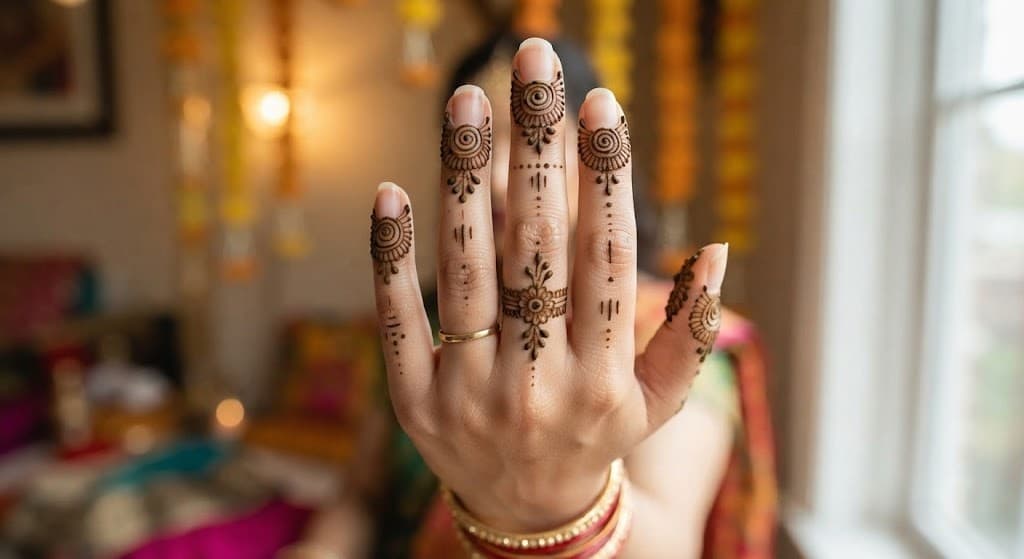
Simple finger mehndi designs
Fingers finish every design, and on their own they make the quickest mehndi of all. These work alone or with any palm or back hand design above.
- Knuckle triangles. A small filled triangle on the middle knuckle of each finger. Point them all the same way. Time: quick.
- Spiral tips. A tiny spiral on each fingertip instead of a cap. Start in the centre and work outwards. Time: quick.
- Dot and dash. Dots and short dashes alternating down each finger. Very quick, and it looks neat on short fingers. Time: quick.
- Thumb leaf. One leaf curving around the thumb, with its tip on the nail side. Time: quick.
- Slanted tips. Each fingertip filled on a diagonal, so half of the tip stays bare. All the slants should run the same way. Time: quick.
- One ring. A fine band with a tiny flower on the ring finger only, and every other finger bare. Time: quick.
Modern simple mehndi designs
Lighter designs are what many people are asking for. When Khaleej Times interviewed henna artists in the UAE for a report in May 2026, they described younger clients choosing minimal, elegant patterns over heavy traditional work.3 Elle India made a similar point in 2025 about modern brides and minimalist designs.4 These six are made for that look.
- Line-art leaf. A single leaf drawn in one continuous outline, with no filling at all. Keep the line unbroken; that is the whole point. Time: quick.
- Geometric cuff. A band of triangles and straight lines at the wrist, with one line running up the middle finger. Time: quick.
- Dot rosette. A rosette made only of dots, in rings that grow larger towards the outside. Time: quick.
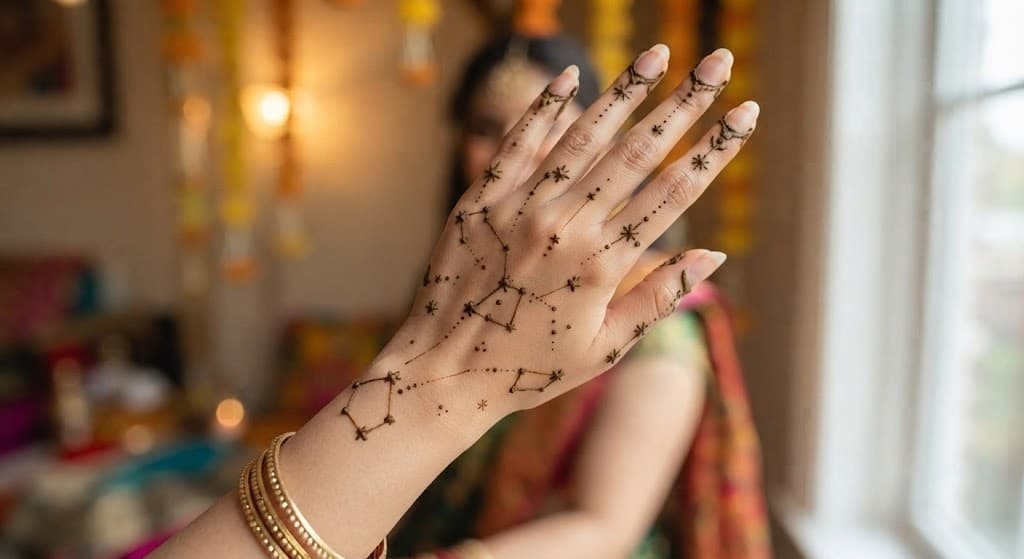
- Constellation. Dots of different sizes joined by fine lines, like a map of the stars, across the back of the hand. Time: quick.
- Single stem. One long-stemmed flower rising from the wrist to the base of the middle finger. Lovely with a western outfit. Time: quick.
- Outlined moon. The outline of a crescent moon with three dots inside its curve, on the back of the hand or the side of a finger. Time: quick.
Simple designs for festivals and occasions
Festivals are when many people want a quick design. Customs vary from family to family, so treat these as ideas, not rules.
- Karva and moon. A small karva, the pot that Karwa Chauth is named after, in the palm, with a moon above it. Karwa Chauth falls on Thursday, 29 October in 2026;5 our Karwa Chauth mehndi designs have twelve more. Time: quick.
- Rangoli corner. A quarter of a rangoli pattern tucked into the base of the palm. Diwali is on Sunday, 8 November in 2026,6 and our Diwali mehndi designs have more. Time: quick.
- Crescent cuff. A band of small crescent moons around the wrist. Mehndi is part of Chaand Raat, the eve of Eid al-Fitr, for women and girls.7 Time: quick.
- Teej creeper. A creeper of small leaves winding around the wrist and up one finger. Teej welcomes the rains with swings, and women decorate their hands and feet with mehndi on Sinjara, the eve of Haryali Teej.8 Time: quick.
- Rakhi bow. A small bow at the wrist with two loose ends, for Raksha Bandhan, when sisters tie a rakhi around their brothers' wrists.9 Time: quick.
- Ring halo. A circle of dots around the base of the ring finger and a thin band below the knuckle, so the engagement ring sits in the middle. Time: quick.
- Guest cuff and tips. A narrow cuff at the wrist and capped fingertips, quick enough to fit into a crowded mehndi function. Time: quick.
- Inner wrist flower. One small flower on the inside of the wrist, where a watch strap or a sleeve can hide it during a working week. Time: quick.
Simple feet mehndi designs
Feet take some of the darkest stains, for the same reason as palms, but you cannot walk until the paste is dry, so simple designs make sense there. Our feet mehndi designs cover footwear, sitting and drying, with 50 more ideas.
- Toe dots and a bar. Every toe capped and a short bar of dots across the top of the foot. Time: quick.
- Instep flower. One flower on the top of the foot with two leaves pointing towards the toes. Time: quick.
- Dotted anklet chain. A chain of dots and tiny loops around the ankle, like a fine anklet. Time: quick.
- Side leaves. A row of small leaves along the outer edge of the foot, from the little toe to the ankle. Time: quick.
Simple bridal mehndi designs
Not every bride wants mehndi to the elbows. A light bridal design still takes longer than a guest's, but it leaves plenty of skin bare and suits pastel outfits. Our bridal mehndi designs cover planning, timing and 40 more designs.
- Light bridal palms. A rosette in each palm with fine fingers and capped tips, the backs of the hands left almost bare. Time: medium.
- Arabic bride. A diagonal Arabic trail on the back and the palm of both hands, mirrored so the hands match. Time: medium.
- Lace cuff bride. A lace band at each wrist, fine lace down every finger and a small motif in the centre of each palm. Time: medium.
Simple mehndi for men and grooms
At many mehndi functions the groom has a little mehndi too,10 and some men simply like a design. Keep it small, bold and easy to wear.
- Palm circle. A single solid circle in the centre of the palm. Time: quick.
- Initial band. A thin band around the wrist with a partner's initial worked into it. Time: quick.
- Leaf on the back. One bold leaf on the back of the hand, with its stem towards the wrist. Time: quick.
Simple designs for children
Children love simple mehndi, but they need extra care: natural henna only, small designs, no henna for babies,11 and none for anyone with G6PD deficiency, an inherited condition for which henna is known to be dangerous.2 If you are unsure about G6PD, check with a doctor before the first design. Our guide to mehndi designs for kids has 40 quick designs and the safety notes parents need first.
Simple mehndi for work, college and everyday
Mehndi is not only for weddings. Plenty of people wear a small design to work or college after a festival, or simply because they like it. A few choices make everyday mehndi easier to live with:
- Choose designs that fade gracefully. Open designs with bare skin look fine as they fade, while dense patterns can look patchy halfway through.
- Keep it where you want it seen. The inner wrist, the side of a finger or a single motif on the back of the hand can be shown or hidden with a sleeve or a watch.
- Think about your hands at work. If your job means washing your hands often, wearing gloves or handling food, a palm design usually lasts better than one on the fingertips, which tend to wear first.
- Do it at the right time. A design applied on a Friday evening has the weekend to darken before anyone sees it on Monday.
- Keep it small for formal settings. One flower or a thin cuff looks deliberate and neat with office clothes.
Matching the two hands
Two hands give you a choice: make them the same, make them mirror images, or let them do different jobs.
- Mirror them. Draw the same design on both hands, flipped so that a diagonal on the right hand runs the opposite way on the left. Held side by side, the hands look like a pair.
- Split the work. Put the main motif on one hand and only fingers and a cuff on the other. It halves the time and still looks planned.
- Palm and back as a set. Choose a palm design and a back design that share one element: the same flower, the same leaf or the same band at the wrist.
- Keep the edges level. Wherever the design stops, at the wrist or partway up the forearm, end both hands at the same point.
If you are drawing on yourself, do your weaker hand first, while your drawing hand is fresh, then copy the design onto the other once the first is dry.
Making a simple design look finished
The difference between a simple design that looks deliberate and one that looks unfinished is usually in the last five minutes.
- Do the fingers. Even capped fingertips tie a palm or back design together.
- Close the edge. End the design with a line, a row of dots or a scallop, rather than letting it fade out.
- Vary the weight. A slightly thicker outline with finer details inside reads better from across a room than lines of one thickness.
- Space evenly. Gaps of the same size between leaves, dots and petals look intentional, and uneven gaps look rushed.
- Leave the bare skin alone. The open space is part of the design, so resist filling it.
- Check it from a distance. Hold the hand out at arm's length before the paste dries. What looks crowded close up often looks right from there, and the other way round.
Building a simple design up
Because simple designs are made of the same shapes, they grow easily. Start with one of the quick designs above and add to it as time allows.
- Start with the main motif. A rosette, a sprig or a single flower.
- Add the fingers. Caps, ring lines or a vine on one finger.
- Add a cuff. A band at the wrist ties the hand together.
- Add a second motif. A smaller version of the first, on the other side of the hand or the other hand.
- Add fillers. Dots, small leaves or a patch of jaal in the spaces.
Each step adds a few minutes, and you can stop after any of them. This is also how to brief an artist when time is tight: agree the main motif first, then add steps until the time runs out.
Getting ready for a simple design
A simple design still benefits from a little preparation, whether you are drawing it yourself or sitting with an artist.
- Wash and dry your hands. Plain soap and water, with no cream, oil or sanitiser afterwards, since anything on the skin sits between it and the paste.
- Take off rings and bangles. Put them somewhere safe; you will not want to touch them for a while.
- Clear your sleeves. Short sleeves, or sleeves that roll well above the wrist and stay there.
- Have tissues and a cotton bud ready. One for wiping the cone tip, the other for lifting mistakes.
- Plan the next hour. Eat, drink and use the washroom first; your hands will be out of action until the paste dries.
- Choose the design first. Have the photo or sketch open before the first line, not halfway through.
How to draw a simple design, step by step
Here are two designs to try first: the diagonal sprig for the back of the hand and the petal rosette for the palm. Practise each on paper until it feels easy, and rest your drawing arm on a table.
The diagonal sprig (back of the hand)
- Plan the line. Picture a line from the base of the index finger to the far side of the wrist. Do not draw it yet.
- Draw the stem. One gentle S-curve along that line, in a single smooth movement.
- Add the first leaf. A leaf at the top of the stem, pointing towards the finger.
- Add leaves in pairs. Working down the stem, add leaves on alternate sides, each a little bigger than the one above.
- Finish the end. A small spiral or three dots where the stem reaches the wrist.
- Add the finger. A thin ring line at the base of the index finger joins the sprig to the hand.
The petal rosette (the palm)
- Find the centre. Cup the hand slightly; the centre of the hollow is where the rosette goes.
- Make the middle. One dot, then a small circle around it.
- Add four petals. Teardrops pointing up, down, left and right, like the points of a compass.
- Fill in four more. One teardrop between each pair, so there are eight.
- Ring it with dots. A circle of small dots just outside the petal tips.
- Cap the fingertips. Fill the tip of each finger and let the whole hand dry.
If a line goes wrong, lift the wet paste with a damp cotton bud straight away and redraw it.
How to hold a mehndi cone
A cone takes a little getting used to. A few habits make a big difference:
- Hold it like a pen. Guide the cone with your fingers near the tip and press with your thumb on the folded top, so the paste is pushed towards the point.
- Cut a tiny tip. Snip the very end with sharp scissors and test it on a tissue. You can always cut more for a thicker line; you cannot make it smaller.
- Squeeze from the top. Steady pressure from the top of the cone, not the middle, gives an even flow. Roll the top down further as the cone empties.
- Barely touch. Hold the tip so it only just touches the skin and let the paste fall into the line, rather than pressing or scraping the tip along the hand.
- Steady your hand. Rest your wrist or little finger, draw long lines with a smooth movement of the wrist and forearm, and use your fingers for small petals and dots.
- Wipe the tip often. A tissue in your other hand stops blobs building up at the point.
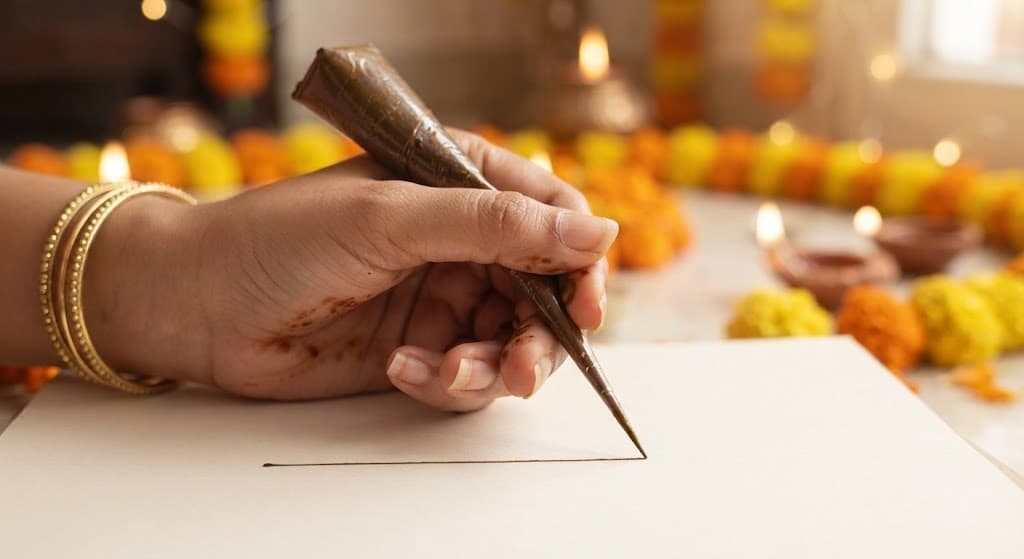
If the paste comes out in blobs, you are squeezing too hard or the tip is too wide. If the line keeps breaking, slow down, or clear the tip with a pin. If the paste will not come out, the tip may be blocked or the paste too dry.
Drawing on someone else's hand
Drawing on a friend is easier than drawing on yourself, once you are both comfortable.
- Sit at the same height. Face each other across a table, or sit side by side with their hand resting on a cushion in your lap.
- Turn the hand, not yourself. Ask them to rotate the hand so the line you are drawing always runs towards you.
- Hold it gently. Support their fingers from underneath with your free hand, well away from the wet paste.
- Work in good light. Daylight from a window, or a lamp to one side, shows the lines without shadows from your own hand.
- Agree the design first. Show them a photo or a sketch, and agree where it starts and stops before the first line.
A seven-day practice plan for beginners
Ten or fifteen minutes a day is enough. Practise on paper first, then on a clear plastic sheet such as a document sleeve, which behaves more like skin.
- Day one: dots and lines. Rows of dots of the same size, then straight lines of even thickness.
- Day two: curves. C-curves and S-curves, in both directions, until they flow.
- Day three: teardrops and leaves. Rows of teardrops, then leaves with their veins.
- Day four: flowers. Five-petal flowers and the petal rosette from the steps above.
- Day five: vines. The diagonal sprig and a vine with buds, on paper and then on plastic.
- Day six: your own hand. The diagonal sprig on the back of the hand you do not write with.
- Day seven: a friend's hand. A petal rosette and capped fingertips on a friend's palm.
By the end of the week, most of the quick designs on this page will be within reach.
If you are left-handed, everything above works the same way, mirrored. Work from right to left so your hand never crosses wet paste, turn the paper or the hand rather than twisting your wrist, and draw S-curves and diagonals in whichever direction feels natural to you, then mirror them later. Practising on your own right hand is easier for you than for most people, because that is the hand right-handed artists find hardest to reach. The Shaadiwaale inspiration wall is a good place to collect designs to try next.
Ready-made cones and homemade paste
In India, mehndi is usually drawn with a plastic cone, much like the ones used to pipe icing on cakes.2 You can buy cones ready to use or make paste at home and fill your own.
Homemade paste. Henna powder is stirred into a liquid, for example water, lemon juice or strong tea, and many artists add sugar or molasses so the paste holds together and sticks to the skin. The mix then needs to rest for anywhere between one and 48 hours to release its dye. Some artists add essential oils such as tea tree, cajuput or lavender. Others, such as eucalyptus and clove, can irritate the skin.2 When natural paste does cause a reaction, it is often to the lemon juice or the oil rather than the henna,2 so ask what is in it. Body-art quality henna is often more finely sifted than henna sold for hair, which makes a smoother paste for fine lines. Fresh paste does not keep for long; it can be frozen for up to four months.2
Ready-made cones. They save time, but read the label and buy from a seller who names every ingredient. Be wary of any cone that promises instant or very dark colour: one artist told Khaleej Times that people choose cones that colour instantly and that many of these contain harmful chemicals.3 Natural henna needs many hours to darken fully,12 so a design that is black or very dark brown the moment the paste comes off is a warning sign.
We have not given a recipe with exact amounts. Follow the instructions that come with a good body-art henna powder, or ask your artist which paste they trust.
Getting a dark colour on a simple design
A simple design has less paste on the hand than a full one, so it is worth looking after.
- Keep the paste on. The paste should stay on for at least four to six hours, and the longer it stays, the darker and longer lasting the stain.2
- Seal it. Once the paste is dry, dab on a little lemon juice mixed with sugar to keep it on the skin.2
- Keep warm, but do not count on it. Some people believe warming the design darkens the stain, but it is debated whether it really adds colour.2
- Scrape it off, do not wash it off. Water gets in the way of the stain developing,2 so scrape the dry paste away and keep the hands dry for a while.
- Give it time. The stain is orange at first and darkens to a deep reddish brown over about three days,2 so for a festival or a function, two days before is best and one day at the latest.
After peaking, a henna stain stays at its best for a few days and then fades gradually as your skin replaces its outer layer, usually over one to three weeks.2 Our complete guide to mehndi has more on aftercare.
Planning simple designs for your guests
If you are hosting a mehndi function, simple designs are what many of your guests will want, and a little planning keeps the queue moving.
- Count who wants mehndi. Add the mehndi function to your guest list and note how many guests want a design.
- Work out the artist time. As an example only: if a simple design takes an artist about ten minutes a hand, thirty guests with one hand each is about five hours of work for one artist. Your artist's own estimate is the one to use.
- Agree a short menu. Four to six simple designs, such as a rosette, a sprig, a cuff and fingertips, help guests choose quickly.
- Put it in the budget. Ask your artist how they charge for guests, and add it to your budget so it does not come as a surprise.
- Add it to the checklist. Booking the artist, confirming the guest count and setting up a corner with cushions and tissues all belong on your wedding checklist.
You can find mehendi artists on Shaadiwaale in cities such as Mumbai, Hyderabad, Goa and Jodhpur.
Questions to ask your mehendi artist
A few questions before you book save confusion on the day, especially when you want simple designs for many guests.
- How do you charge for guests? By the hand, by the guest, by the hour or as a package. Ask what counts as a simple design.
- Can I see simple designs you have done? A portfolio full of bridal hands does not tell you how quick and neat their guest designs are.
- What is in your paste? Natural henna only, and ask which oils or other ingredients they add.
- How many guests can you do in an hour? And will they bring a second artist or a helper for a long queue?
- Can guests choose from a menu? A short list of simple designs keeps the line moving.
- What happens if we run over time? Agree it before the function, not during it.
Mistakes to avoid
- Filling every gap. The bare skin is part of a simple design. Stop before it feels finished.
- Starting at the edge. Begin with the main shape and work outwards, so the design ends up where you meant it to.
- Drawing towards wet paste. Plan the order so your hand never rests on what you have just drawn: for a right-handed artist, that usually means working from left to right.
- Cutting the tip too wide. Thick lines blur as they dry. Start fine and cut more only if you need to.
- Copying a design meant for a different hand. A design drawn for long fingers may look crowded on small hands. Scale it down rather than squeezing it in.
- Washing it too soon. Water on fresh mehndi lightens it. Scrape first, and keep the hands dry for a while.
Staying safe
Simple or not, mehndi should be made with natural henna. Stay away from black henna and "instant" cones: black henna often gets its colour from PPD, which the FDA says can cause dangerous skin reactions for some people.13 Health Canada's three warning signs: the colour is very dark black, the paste sets very fast, or there is little or no smell. It also notes that an allergic reaction to PPD can take between 1 and 14 days to show.12
Henna is not for babies, or for anyone with G6PD deficiency at any age. Doctors reporting a serious case in a WHO journal in 2017 advise against henna for infants generally, and for people of any age who have G6PD deficiency.11 With sensitive skin, test a small dot of the same paste on your inner arm a day or two ahead. That can reveal a problem with an ingredient, but it is no guarantee, since a PPD reaction may take as long as two weeks to show. Brides should test a few weeks ahead, as our bridal guide explains. Keep paste off broken or irritated skin.
Frequently asked questions
What is the simplest mehndi design?
A petal rosette in the centre of the palm: a dot, a small circle, eight teardrop petals and a ring of dots, with the fingertips capped. It uses only three basic shapes and takes about ten to fifteen minutes. On the back of the hand, a diagonal sprig of leaves is just as easy and takes even less time.
Which simple mehndi design is best for the front hand?
A design centred in the palm, because the palm takes the deepest colour. The petal rosette, the low lotus, the teardrop fan and the scallop band are all quick and easy to keep neat. Add capped fingertips to make any of them look finished, and keep the wrist clear if you will wear a lot of bangles.
Which simple mehndi design is best for the back hand?
A diagonal, because it follows the shape of the hand and shows in every photograph. The diagonal sprig, the three-bloom Arabic diagonal and the thread and ring are good choices. Because the back takes a lighter stain than the palm, bolder lines help, and so does keeping the paste on longer.
What is a simple Arabic mehndi design?
A short diagonal of bold flowers and leaves surrounded by bare skin. A simple Arabic design keeps the trail to three or four flowers, uses light shading and often adds a single finger vine. The three-bloom diagonal and the thumb sweep are good ones to start with, on either side of the hand.
How can I learn mehndi at home?
Start with the eight basic shapes: dots, lines, curves, S-curves, teardrops, leaves, spirals and scallops. Practise them on paper, then on a clear plastic sheet, then on the back of your own hand. Ten or fifteen minutes a day for a week is enough to draw a petal rosette and a diagonal sprig with confidence.
How long does a simple mehndi design take?
Most simple designs take from a few minutes to about half an hour a hand. Fingertips alone take a few minutes; a diagonal sprig about five to ten; a petal rosette about ten to fifteen; a simple Arabic diagonal about fifteen to twenty. Add drying time on top, and leave the paste on for several hours afterwards for a good colour.
How do I make a simple mehndi design darker?
Leave the paste on for four to six hours at the very least, and longer if you can. Seal the dry paste with a dab of lemon juice and sugar, scrape it away instead of washing, and keep water off your hands for a while. Then be patient: orange at first, the stain deepens over roughly three days.
Should I make my own henna paste?
You can, if you have time to let it rest. Homemade paste is henna powder mixed with a liquid such as lemon juice or tea, and it needs between one and 48 hours to release its dye. Ready-made cones are quicker, but read the ingredients and avoid any that promise instant or very dark colour.
Is a simple mehndi design enough for a wedding guest?
Yes. Guests usually have a quick design, sometimes on one hand only, and a neat cuff with capped fingertips or a short Arabic diagonal looks lovely in photographs. If you will wear a lot of bangles, keep the design on the hand and the fingers, and leave the wrist clear.
Can I put simple mehndi on my own hands?
Yes. Start with the hand you do not write with, resting it flat on a table, and choose a design that sits where you can see it easily, such as the back of the hand or the fingers. The palm of your writing hand is the hardest place to reach, so keep that design very simple or ask a friend.
How long does simple mehndi last?
The stain darkens for about three days, holds at its best for a few days more and then fades as the skin renews, usually within one to three weeks. In our experience, palm designs outlast fingertip designs, since fingertips are used and washed the most. Frequent washing and scrubbing shorten its life.
Is mehndi safe?
Health Canada calls natural henna generally safe to use on the skin. The danger lies in black henna and "instant" cones, which may contain PPD, a chemical linked to dangerous skin reactions. Babies and people with G6PD deficiency should not have henna at all, and if your skin is sensitive, test a small dot first.
Share this guide
Send it to the family group, or keep it for later.
Questions about your wedding?
Our team answers questions about venues, vendors and the budget, free on WhatsApp.
About Shaadiwaale
Indian wedding planning in one place: venues and vendors with real prices, free kundli matching, invitations and tools to plan every function together.
Every function. Every family. One plan.
Notes
- Henna: rituals, aesthetic and social practices, UNESCO Intangible Cultural Heritage, inscribed 2024 for sixteen Arab countries. Henna in everyday life and at births and weddings; traditions passed on through observation and hands-on practice, and today also by beauty centres, universities and the media. ↩
- Henna, Wikipedia. Palms and soles with the thickest skin taking the darkest stains; G6PD deficiency; the plastic cone used in India; paste made with water, lemon juice or strong tea; sugar or molasses for consistency; resting one to 48 hours; essential oils used, and eucalyptus and clove that can irritate the skin; reactions to natural paste often linked to lemon juice or essential oils; body-art quality henna often more finely sifted; freezing paste for up to four months; paste on for at least four to six hours; sealing with lemon and sugar; warming beli ↩
- Hengua to minimalistic motifs: UAE henna artists reveal top designs for Eid Al Adha, Khaleej Times, Nasreen Abdulla, 26 May 2026. Younger clients preferring minimal, elegant patterns; cones that promise instant colour. ↩
- From Arabic to minimalist: 10 stunning mehendi designs trending in 2025, Elle India, Tanvee Khanna, 16 September 2025. Modern brides opting for minimalist designs. ↩
- Karwa Chauth 2026 date and time for Jaipur, Drik Panchang. Karwa Chauth on 29 October 2026. ↩
- 2026 Diwali puja calendar for New Delhi, Drik Panchang. Diwali on 8 November 2026. ↩
- Chand Raat, Wikipedia. Women and girls decorating their hands with mehndi on the eve of Eid al-Fitr. ↩
- Teej, Wikipedia. Teej, swings and the monsoon; mehndi on hands and feet on Sinjara. ↩
- Raksha Bandhan, Wikipedia. Sisters tying a rakhi on their brothers' wrists. ↩
- Mehndi, Wikipedia. Mehndi applied on the bride and groom. ↩
- Life-threatening haemolysis induced by henna in a Sudanese child with glucose-6-phosphate dehydrogenase deficiency, Eastern Mediterranean Health Journal (WHO), volume 23, 2017. Henna to be discouraged in infants in general and in G6PD-deficient people of any age. ↩
- Black henna temporary tattoos, Health Canada. Natural henna generally safe on skin and needing many hours to darken; three warning signs of black henna; reactions 1 to 14 days after contact. ↩
- Temporary tattoos, henna/mehndi, and "black henna": fact sheet, US Food and Drug Administration. Black henna and PPD. ↩